The Free WordPress Migration Checklist
Key takeaways
- Do these in order. Skip any phase and the failure mode is predictable.
- Drop TTL to 300 seconds 48 hours before cutover. Single most-forgotten step.
- Configure SMTP through a transactional provider before touching DNS. Otherwise WordPress email lands in spam the second the IP changes.
- Test on staging via a hosts-file entry. Cut over broken and you fix in production, which is where you have the least time.
- Cut over on a weekday morning. Never Friday. Keep the old host running for 30 days minimum.
- Rollback plan is one string — the A record you changed. TTL 300 makes reversal take 5 minutes.
Most WordPress migration guides skip the parts that break sites. They describe the export, they describe the import, they wave at DNS. Then you cut over on a Friday and Monday morning your form emails are landing in spam, half your theme's images are 404, and Search Console is quietly de-ranking you because your sitemap URLs still point at the old domain.
This checklist covers the parts that break sites.
It is written to be usable regardless of where you're moving to. If you're going to Kinsta, use it. WP Engine, use it. Your friend's VPS, use it. Us, use it. The mechanics are the same. Where hosts differ meaningfully (email deliverability behavior, WP-Cron, cache stack), we call out where it will bite you.
Nothing below is a lead magnet in disguise. Print it, screenshot it, share it. If it saves one site from a botched cutover, it paid for itself.
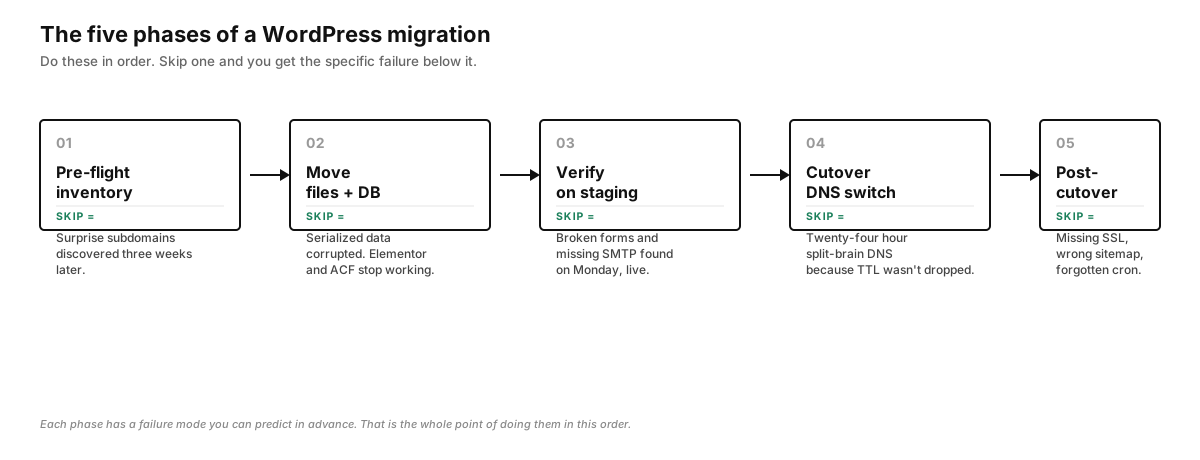
The migration in five phases
- Pre-flight — inventory, DNS TTL prep, backup verification, MX audit.
- Move — files, database, plugins, staged on the new host.
- Verify on staging — SSL, links, forms, cron, cache, email.
- Cutover — DNS switch, monitored.
- Post-cutover — SSL reissue, 301s, sitemap, Search Console, rollback ready.
If you skip any phase, the failure mode is predictable. Skip the inventory and you find out you forgot a subdomain three weeks later. Skip the TTL prep and cutover takes 24 hours instead of 15 minutes. Skip the post-cutover validation and you notice the missing SSL cert when a customer emails you a screenshot of the browser warning.
Phase 1 — Pre-flight
The inventory table
Before you touch anything, fill this out. It is boring. It is also the single highest-leverage 30 minutes of the whole migration.
Copy-paste the block below into a Google Sheet or Notion table. The columns are named to sort cleanly.
Domain / Subdomain | Purpose | Currently hosted at | DNS registrar | Email provider | Cert type | Current TTL | Backup verified (Y/N/date) | Notes
example.com        |         |                     |                |                |            |             |                            |
www.example.com    |         |                     |                |                |            |             |                            |
mail.example.com   |         |                     |                |                |            |             |                            |
shop.example.com   |         |                     |                |                |            |             |                            |
staging.example.com|         |                     |                |                |            |             |                            |
Fill in every subdomain that resolves. Not just www. Everything. mail, shop, webmail, cpanel, blog, dev, that one wildcard record from 2019. If it has a DNS entry, it goes on the sheet.
Then, for the site you're actually migrating, list these too:
- WordPress admin URL and credentials (test them right now, in an incognito window)
- Database name, user, host, size (
SELECT SUM(data_length + index_length)/1024/1024 AS mb FROM information_schema.tables WHERE table_schema = DATABASE();) - PHP version currently in use
- Installed plugins with license keys (Yoast Premium, Gravity Forms, WP Rocket, ACF Pro — write down every key)
- Currently active theme + child theme
- Uploads directory size (
du -sh wp-content/uploadsif you have SSH) - Any
mu-pluginsor non-standardwp-contentdirectory - CDN in front of the site (Cloudflare, BunnyCDN, KeyCDN) and its cache-purge credentials
- External services calling into the site (Zapier, Make, custom webhooks)
If you don't know all of these before you start, you will discover the ones you missed during the cutover, which is exactly when you have the least time to solve them.
Drop your DNS TTL to 300 seconds — 48 hours before cutover
This is the single most important pre-flight step. It is also the one people forget.
DNS records have a TTL (time to live). Resolvers around the internet cache your DNS records for that many seconds. If your A record TTL is 3600 (1 hour) and you change the record, some resolvers will keep serving the old IP for up to an hour after the change. If the TTL is 86400 (24 hours), you can be looking at split-brain DNS for a full day.
Two business days before you plan to cut over:
- Log into your DNS registrar.
- Set the TTL on your
Arecord (andAAAAif you have one) for both@andwwwto 300 seconds (5 minutes). - Save.
- Wait for the old, higher TTL to expire. If it was 3600, wait an hour. If it was 86400, wait 24 hours before you touch anything else.
The TTL change itself is subject to the old TTL. This is why you do it early. Once 300 has propagated, your cutover window collapses from "up to a day" to "up to five minutes."
After the migration is stable — usually 48 hours after cutover — raise it back to 3600 or 86400. Low TTLs mean more DNS lookups. Not a problem for a day. Slightly wasteful forever.
Audit MX and email records BEFORE you look at anything else
The most common way a migration ruins someone's week: they move the site, and email stops working, because they didn't think about email.
Before you touch anything, write down:
- Every MX record on the domain
- The SPF record (
TXTstarting withv=spf1) - Any DKIM records (usually
default._domainkeyor provider-specific likegoogle._domainkey) - The DMARC record (
_dmarc.example.comTXT) - The
MAIL FROMserver your site uses to send transactional email (WooCommerce receipts, form notifications, password resets) — this is often a separate concern from mailbox hosting
If your MX records point to Google Workspace or Microsoft 365, the migration does not affect inbox email as long as you don't touch MX. But WordPress-generated email — order confirmations, contact form notifications, admin alerts — sends from the web server by default. When you move to a new IP, that mail starts going out from an IP that isn't in your SPF record, and it lands in spam.
Fix this now, not later. Options, in order of reliability:
- Install an SMTP plugin (WP Mail SMTP, Post SMTP, FluentSMTP) and route WordPress mail through a transactional provider (Postmark, Mailgun, Amazon SES, Google Workspace SMTP). Configure it on the current site. Verify it works. Then migrate. The new host inherits a working config.
- If you must send from the web server, add the new host's outbound IP to your SPF record before cutover, not after.
- Whichever route: update DMARC only after the new sending path has a good reputation.
p=rejectduring a migration is a good way to bounce your own receipts.
Verify the backup before you trust it
Every migration guide says "make a backup." Almost none say "restore that backup somewhere and confirm it opens."
Do the second thing. Restore your backup to a local Docker WordPress or a temporary subdomain. Log in as admin. Click into three posts. Load a form. Confirm images render.
An unverified backup is a rumor.
Phase 2 — The move
There are three ways to move a WordPress site. Pick the one that matches the site's size and complexity.
Path A — All-in-One WP Migration or Duplicator (small sites, < 500 MB)
For simple sites with no shop, no membership plugin, and no serialized options weirdness, the plugin route is fastest.
- On the old site, install All-in-One WP Migration (or Duplicator).
- Export to a file. Download it.
- Provision the destination: fresh WordPress on the new host at a staging subdomain.
- Install the same plugin on the destination. Import the file.
- Skip to Phase 3.
Caveat: All-in-One's free tier caps file uploads. For most sites this is fine; for anything over ~500 MB you'll need a paid extension or a different path.
Path B — Manual file + database migration (the reliable path)
This is the path we recommend for any site over 500 MB, any WooCommerce site, and anything with heavily serialized data.
- Files. SFTP or rsync
wp-content/to the new host. Don't copywp-content/cache/— it's just going to be stale. If you havewp-config.phpcustomizations (memory limits, custom cron, disabled file editor), keep them; you'll merge them into the newwp-config.phpat the end. - Database. From the old host,
mysqldump --single-transaction --quick --routines --triggers dbname > site.sql. If you don't have shell, use phpMyAdmin's SQL export with "Custom" options — check "Add DROP TABLE" and "Use single-transaction". - Import. On the new host, create the target database, then
mysql -u newuser -p newdb < site.sql. - wp-config.php. Copy the file, then update
DB_NAME,DB_USER,DB_PASSWORD,DB_HOSTto the new host's values. KeepAUTH_KEYand the other salts exactly as they are — changing them logs everyone out but breaks nothing else. - URL rewrite. This is where serialized data will destroy you if you do it wrong. See "Gotchas" below. Use WP-CLI:
   wp search-replace 'https://old.example.com' 'https://staging-new.example.com' \
     --skip-columns=guid --dry-run
Run the dry-run first. Check the count. Then re-run without --dry-run.
- Point staging at the new site. Add a hosts-file entry on your workstation (
/etc/hostson Mac/Linux,C:\Windows\System32\drivers\etc\hostson Windows) soexample.comresolves to the new host's IP for you but nobody else. Verify the site loads before you touch real DNS.
Path C — Host-supplied migrator (fastest, if it works for your site)
Most managed hosts have their own migration plugin — SiteGround Migrator, WP Engine Automated Migration, Kinsta's migration form, Bluehost's migration tool. These plugins do the file + database copy + URL rewrite in one pass. They work well on straightforward sites.
They fail predictably on: multisite, custom database tables from membership plugins, hard-coded absolute URLs in theme files, sites over ~5 GB. If you're on any of those, use Path B.
Phase 3 — Verify on staging
Before you touch DNS, run through this on the new host's staging URL:
- Log in as admin. If wp-admin loads, the database migrated. If it 500s, check
wp-config.phpDB credentials and PHP error log first. - Front-end loads. Homepage, a category page, a single post, a page with a form.
- Images render. Not just featured images — inline images inside posts. If they 404, you have hardcoded URLs somewhere; re-run
wp search-replaceon the affected table. - Search-and-replace ran cleanly.
wp search-replace 'https://old' 'https://new' --dry-runshould now report zero matches. - Forms submit and email arrives. Do not skip this. Submit a real contact form entry. Confirm the notification lands. If it doesn't, your SMTP setup did not migrate. Fix it here, not after cutover.
- SSL is valid on the staging URL. If you get a cert warning, resolve it before cutover. Most managed hosts issue a Let's Encrypt cert automatically once DNS points at them, but staging URLs sometimes need a manual request.
- Redirects still work. If you had
.htaccessor nginx-level redirects for old URL structures, verify they came over. This is one of the most common quiet failures — the redirects live in server config, not in the database, and they don't migrate with the plugin. - WP-Cron runs. Load a page, then check the Tools > Site Health screen for scheduled events. See the gotchas section on cron.
- Sitemap is reachable.
/sitemap_index.xml(Yoast) or/wp-sitemap.xml(core). Make sure it renders and lists the new domain if that changed, or the same domain if the domain isn't changing. - robots.txt does not disallow crawlers. Some staging environments ship with a
Disallow: /robots.txt. If yours does, remove it before the domain flips.
If any of these fail on staging, fix them on staging. Cutting over broken and fixing in production is how you end up in a five-hour Slack war with yourself.
Phase 4 — DNS cutover
Do this on a weekday morning. Not Friday afternoon. Not before a long weekend. Not the day before a product launch.
- Confirm your
Arecord TTL has been at 300 for at least the length of the previous TTL. - Change the
A(andAAAAif used) record for@andwwwto the new host's IP. - Save.
- Start a timer. Watch
dig @1.1.1.1 example.com +shortanddig @8.8.8.8 example.com +shortfrom another window. Within five minutes both should return the new IP. - Confirm HTTPS loads from your browser (hard-refresh; clear the local DNS cache if you're paranoid).
- Confirm the SSL certificate on the live domain is valid. Most hosts auto-issue on DNS propagation; some need a manual click.
Do not touch MX records unless you're also moving email. If your mail is at Google Workspace or Microsoft 365, the MX records point to them, not to the web host. Leave MX alone.
Do not delete anything from the old host yet. Keep it running for at least seven days after cutover.
Phase 5 — Post-cutover validation
Within the first hour:
- Live site loads over HTTPS with a valid cert.
- WordPress admin loads. Log in.
- A test comment or form submission works. Email notification arrives.
- WooCommerce (if applicable): put a test product in the cart and reach checkout. Do not complete a real payment; use a test-mode transaction if Stripe/etc. supports it.
- Check for mixed-content warnings in the browser console. Fix any that appear — they usually point to hardcoded
http://URLs.
Within the first 24 hours:
- Google Search Console: submit the sitemap. If the domain didn't change, no property change is needed; just resubmit the sitemap.
- If the domain changed: add the new property, verify ownership, submit a Change of Address in the old property, upload the sitemap on the new property.
- Set up a Statuscake, UptimeRobot, or Better Stack HTTP check hitting the new site every minute. Alert to email + phone.
- Verify Google Analytics / Plausible / your analytics of choice is receiving events on the new host.
- Send a test email to a Gmail address. Check the "show original" headers. Confirm SPF pass, DKIM pass, DMARC pass. If any of these say
failorsoftfail, address before your next campaign send.
Within the first week:
- Raise TTL back to 3600 or 86400.
- Set up automated backups on the new host and verify a restore.
- Cancel autopay on the old host (but keep the account open until day 30 in case you need to reach a file).
- Update any external services that reference the old host by IP — cron webhooks, Zapier, Make, monitoring services.
The gotchas that eat migrations
Hardcoded URLs in theme and plugin files
Some themes and older plugins hardcode https://old.example.com into PHP or JS files. wp search-replace won't touch those — it only runs against the database. After migration, grep -r 'old.example.com' wp-content/themes wp-content/plugins and fix any hits by hand.
Serialized data
WordPress stores options, widgets, and Elementor/Divi/ACF payloads as PHP-serialized strings. A naive sed or MySQL REPLACE() on the SQL dump will corrupt them because the serialized-string length header no longer matches the string. Use WP-CLI's wp search-replace, WP Migrate DB, or Better Search Replace — all three are serialization-aware. Do not use sed on a WordPress database dump. Ever.
Cache plugin conflicts
If the old site ran W3 Total Cache or WP Rocket and the new host has server-level caching (Nginx FastCGI cache, Varnish, LSCache), the plugin will fight the server layer. Symptoms: logged-in users seeing cached anonymous pages, or WooCommerce carts leaking between sessions. Deactivate the plugin cache before cutover; let the server layer do its job. Add the plugin back only if you actually need something the server cache doesn't handle.
WP-Cron
wp-cron.php runs on page loads by default. If your old host disabled default cron and used a system cron instead, that system cron does not migrate — it lived in the host's control panel. On the new host, either re-enable page-load cron (add define('DISABLE_WP_CRON', false); to wp-config.php) or set up a real cron ( * curl -s https://example.com/wp-cron.php > /dev/null).
Symptom of forgotten cron: scheduled posts don't publish, backups don't run, WooCommerce subscriptions don't renew, sitemaps don't rebuild.
Email deliverability after IP change
Covered in Phase 1, but worth repeating: the second your A record moves, WordPress-generated email is going out from a new IP that is not in your SPF record. Configure SMTP through a transactional provider before you cut over. This is the single most-forgotten step in every migration.
Cloudflare in front of the site
If Cloudflare is proxying (orange cloud), the visible A record is Cloudflare's IP, not your host's. To move hosts, you change the origin IP inside the Cloudflare DNS panel, not at your registrar. Also flush the Cloudflare cache after cutover, or the CDN will serve the old site for hours.
.htaccess overrides
WordPress's default .htaccess is fine. Custom rules (bot-blocking, redirects, expiration headers) migrate with the file but sometimes assume Apache-specific modules. Nginx-based hosts (Kinsta, WP Engine, most modern managed hosts) do not read .htaccess at all. Rules there quietly stop working. Convert to server-level config or plugin-level redirects.
The rollback plan
Have one. Write it down before cutover, not during.
- Old host is still live and paid for at least 30 more days. Cost is trivial, insurance is enormous.
- DNS
Arecord change is one string. If cutover fails, changing that string back is the entire rollback. Because you dropped TTL to 300, it takes five minutes to reverse. - Files on the old host are unchanged. Do not delete or archive the old site until day 30.
- Take a fresh backup of the new site 24 hours after cutover. If a problem appears three days later, you want a clean backup of the working new-host state to restore to.
The rollback plan you don't need is cheap. The one you didn't have is expensive.
Not doing this yourself? Candor Host runs the entire checklist above for you, included on every plan — starting at Solo, $15/mo. A human on our team handles files, database, email, and DNS, staged for your review. If we can't migrate cleanly, cancel inside your 30-day money-back window for a full refund. See how migration works.
Print-ready summary
The whole checklist in twelve bullets:
- Fill in the inventory table. Every subdomain, every credential, every plugin license.
- Verify a backup by restoring it somewhere.
- Configure SMTP through a transactional provider — before you touch DNS.
- Drop
Arecord TTL to 300 seconds, at least 48 hours before cutover. - Copy files. Import database. Update
wp-config.php. Runwp search-replacewith--dry-runfirst. - Test on staging via hosts-file entry. Front-end, admin, forms, images, SSL, cron, sitemap.
- Cut over on a weekday morning. Watch DNS propagate with
dig. - Confirm HTTPS cert issues on the live domain.
- Submit sitemap in Search Console. Update Change of Address if the domain moved.
- Verify SPF, DKIM, DMARC pass on a real outgoing email.
- Keep the old host running for 30 days. Raise TTL back after 48 hours stable.
- Cancel autopay on the old host. Take a fresh backup of the new site.
Do these in order. Skip none of them. Save this page.
Written by the Candor Host team. Corrections and additions welcome — email hello@candorhost.com. We update this checklist when tooling changes; last updated July 2026.